
Royal Staffordshire
English Fine Bone China Figurines


Our Production Process
THE ART OF FIGURINE MAKING
How we make our beautiful figurines in our factory in Stoke-on-Trent, the home of The Potteries.
Ever wondered how we make our Royal Staffordshire figurines?
The process of figurine making is a highly skilled and facinating art form, and we are proud to show you how we make our Royal Staffordshire figurines here in Britain. While each figurine requires its own unique elements the process remains the same with what call the 14 Stages of Figurine Making.
1) Concept
It all starts with an idea. We all sit down as a team round a table with tea and coffee and brainstorm ideas, thinking about a theme or a story and then decide on a new and original idea for our new figurine.
2) Design
We sketch ideas for our new figurine, considering the type of dress, pose, hair, decoration, accessories, and colours we want to use.
3) Clay Sculpture
This is where we hand the design idea over to one of our talented master sculptors to bring the design to life by producing a clay model of our figurine. So much skill goes into this process as the sculptor must create a beautiful work of art with such fine detail.
Did you know? Every model is made 15% larger than the finished figurine as it will shrink once it is fired due to the water evaporation.
4) Blocking
This is where we see our beautiful clay sculpture get destroyed as she gets cut up into multiple pieces. We only have the one original sculpture so this is such a critical stage as any mistakes here mean we would have to start again from the beginning. The blocker has to decide how many parts that the sculpture needs to be cut into and make separate plaster of Paris moulds of each of them. Each mould made can have up to 5 separate parts.
Did you know? To ensure the highest quality throughout each figurine we only make about 25 figurines from each mould before we create new moulds to ensure the quality is the same for every figurine we make.
5) Casing
The original mould is so important as this is all that is left of the original sculpture. This mould can only be used 3 times before we lose the detail of the mould due to the abrasive nature of clay. Therefore before this happens the block mould has to itself be moulded to create a "Case" made out of rubber. We can then use the “Case” to create the working moulds for our production pieces. These moulds will be used for no more than 25 casts before we replace them ensuring that no detail is lost in the process.
6) Casting
Here we recreate the original sculpted model by pouring liquid bone china clay (known as slip) into each of the moulds we created. After about 20 minutes the plaster of Paris moulds absorb water out of the slip leaving a coating of solid clay (known as the cast) once we pour the slip out of the moulds. The individual pieces within the moulds are then carefully removed dry and hard enough to be handled.
7) Assembly
Now we put the figurine together using more slip to attach all the pieces to recreate the original sculpture. Once the figurine is assembled it will be put in the kiln for firing so the whole figurine must be hollow to ensure no air is trapped. We do this be ensuring each adjoining part has small holes in it to allow air to flow through the whole figurine.
Did you know? If we had any air trapped inside our figurine it would explode once it was in the kiln which can reach temperatures around 1280°C.
8) Clay Decoration
This is where we get our specialists in to add the hand applied detail that makes our figurines so unique! Whether it is flowers or butterflies, each one is handmade individually and then attached using slip.
Did you know? Flower clay is a special blend of fine bone china to help strengthen the very delicate petals of clay.
9) Biscuit firing
Now we are ready to put our figurine into the kiln for the first time! During this process our fine bone china figurine takes on a transformation from a dull grey figure into a translucent white finish. These figurines have to be carefully placed onto the kiln along with props to support it during the initial firing ensuring the figurines keep their shape. This process can take up to 12 hours.
Did you know? The kiln needs to reach temperatures of 1240°C to mature the bone china translucent. At this temperature the figurine takes on a jelly like quality and shrinks by about 15%.
10) Glazing
Now we need to apply a thin layer of liquid glass to each figurine to give them a shiny glossy finish meaning they are less likely to get as dirty as matte finish. There are different techniques to achieve this and while others generally dip the figurines into the liquid glass, we use the technique that gets the best quality finish which is spraying each one individually by hand. This technique results in an even finish without the glaze being too thick. The glazed figurine then returns to the kiln for the second time where it is fired to a temperature of 1080°C melting the powdered surface to form a clear and sparkling white surface. The fine details will be visible through the transparent coating and any figurines that are not perfect get destroyed.
11) Painting
The painting stage requires a tremendous amount of knowledge and skill as the colours will change once they are exposed to 820°C of heat. This means painting it a different colour to the desired outcome which only the most highly skilled and experienced painters can judge. This stage will also see enamel painting and firing as well which is done is a separate kiln. To avoid colours mixing into each other, the colours are done separately and then fired meaning the painting stage can have 3 or 4 separate firings.
12) Lithography
This is where we add the fine details to our figurines including the faces, dress details, and back stamp. First we get the litho created based on the original design and this process requires a whole other skillset. Once we have this created we use special paper and colours, we make a silk-screen print that can be fired to a temperature of up to 820°C. The paper that is used is coated in a layer of gum which we then print special ceramic colours onto. The finished print is then coated in a thin layer of plastic. The litho is soaked in water in order to apply it to the figurine as this dissolves the gum on the paper. The plastic coat is released which holds the printed image in place.
13) Gilding
This is the final decoration stage where we apply luxurious 22ct carat gold or pure platinum to our figurines. Each figurine varies but may require gilding on the jewellery such as the necklace, rings of a tiara as well as on the edge of the dress. This requires very steady hands to apply delicate strokes with tiny gilding brushes, ensuring the correct amount is applied whilst ensuring no wastage. The gold also lightens during firing so it is darker at this stage and it is up to the Gilder to judge how this will look once fired. Once applied we then fire this between 750°C and 770°C. Each stage of firing is gradually lower than the previous ensuring the colours will not be affected.
14) Final inspection and packaging
We have completed our figurine and now we need to inspect it to ensure it is at the highest standard. Anything less gets destroyed and we start again. Then we box this with a certificate of authenticity and the figurine is ready to go to a loving figurine collector.
 Sculptor Neil Welch creating the initial clay model |
|---|
 The final clay model completed |
 The dress comes out of the mould |
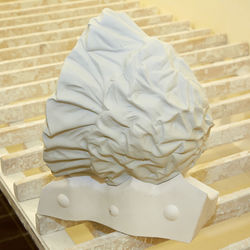 The final dress is ready |
 The head and bodice come out of the mould and are ready to be applied to the dress |
 The head, arms and veil are all made from one mould and then assembled together |
 The bodice and dress are then assembled |
 Then the arms are attached |
 We have a whole figurine put together, now we need to paint her |
 The figurines are left to dry for 12 hours before we begin painting |
 Each figurine is hand painted by the most skilled craftsmen |
 A very steady hand is required |
 Once the body is painted it's time to do the hair |
 Now these stunning figurines are ready for their final photoshoot before they go to their new loving homes |
Download our FREE Guide
14 Stages of Figurine Making. Download


